How to Install a Wifi Printer on Windows 10

Would you like to install a WiFi printer on your Windows 10 PC, but you don't know how to do ? Indeed, it is necessary to carry out a certain procedure for connect a wireless printer via Wifi network. However, the latter is not very complicated. And above all this solution will offer you more mobility et reduce the number of cables connected at your computer. So we will explain to you how to initialize a wireless printer. Then we will show you how to add a WiFi printer to your Windows 10 PC. Finally if you encounter difficulties, we will tell you how to solve a printing problem on Windows.
How to initialize a wireless printer?
Initializing a printer turns on the device. But above all, it allows make the printer discoverable on the Wifi network. Without it, your PC Windows 10 would not recognize the printer. Indeed when the device is initialized, it will then be necessary add the printer to your PC to establish the connexion between the two. We will tell you that below.
It must be known that initialization procedure may differ from one brand to another for example Epson, Canon ou HP. However, the main stages of the procedure for install a printer scanner on Windows 10 remain quite similar. So we have listed them below.
- Start by putting an ink cartridge in the printer,
- Then plug the latter to an electrical outlet,
- Turn on the device by pressing the power button,
- Then you will have to press the Wifi button,
- This will allow you either print the WPS code. This is the case with the Canon MG3600 printer. Otherwise you will see the pin code displayed on a digital screen, in particular for HP printers.
- Keep this code for the game Add a printer on a Windows 10 PC.
If you meet difficulty initializing the printer. Know that there is installation manuals for each printer available on the official website of the manufacturer. Otherwise you can consult the user guide provided when purchasing the printer. When these steps are completed, you can go to the PC for add printer with Windows 10.
Add a WiFi printer on a Windows 10 PC:
Now that the printer is initialized. You will be able to carry out the rest of the procedure on your Windows 10 computer. As a first step, you need to make sure that the PC is correctly connected to the Wifi network. If you don't know how, you can check out the following article: HOW TO ACTIVATE WIFI ON WINDOWS 10. Otherwise if you have Wifi connection problems. We suggest you read the following article: WINDOWS 10: WIFI CONNECTION PROBLEM.
Once your computer is connected to Wifi, you can go to the Device Settings at section level "Printers and scanners". This will allow you add device on your computer this is necessary for establish connection.

To add a WiFi printer on a Windows 10 PC. Perform the steps described below:
- Access the Windows 10 settings by pressing the toothed wheel in the menu Start,
- Then choose " Peripheral devices ",
- Head to the tab "Printers and scanners",
- And press the "Add a printer or a scanner ",
- Let the computer charge while the research is in progress,
- Select your Printer,
- Si Windows does not recognize the printer, you must try again to press the Wifi button of the printer to make it detectable.
- And push the button "Add device",
- And enter the WPS Pin Code the printer,
- Click on " Following ",
- Finally finalize installing the printer.
Fix a problem with the Wifi printer on Windows 10:
When you meet a problem installing the printer in Wifi on your Windows PC. We suggest you use Windows 10 printing troubleshooter.
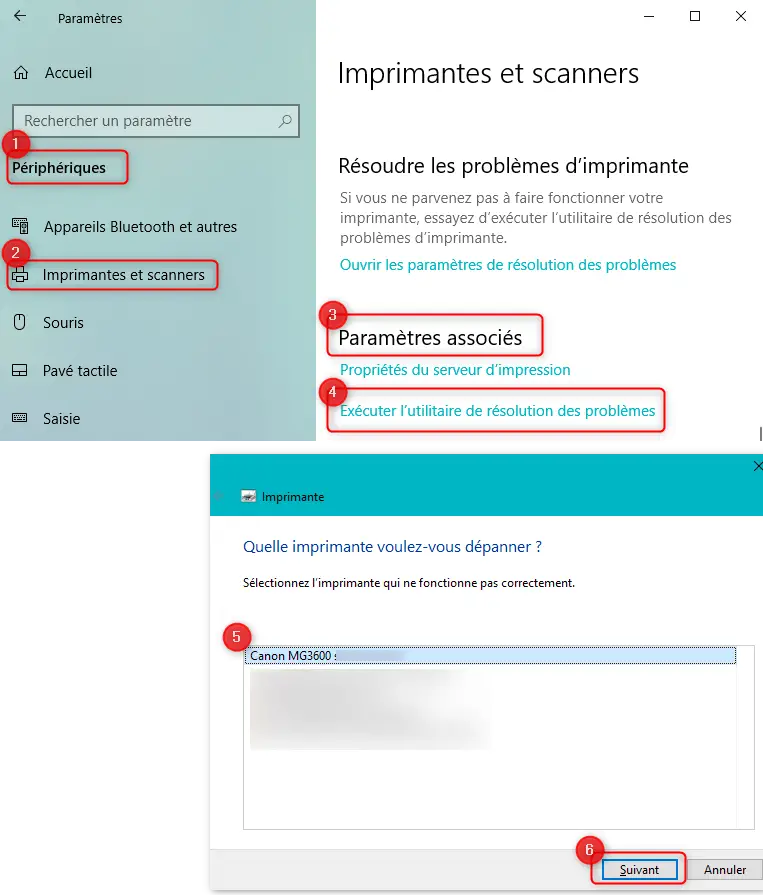
To launch the Windows 10 troubleshooter scan. Follow the method detailed below:
- In Windows 10 settings (toothed wheel in the Start menu,
- Select " Peripheral devices ",
- And click on the tab "Printers and scanners",
- In the sub-section "Associated parameters", press the link "Run the troubleshooting utility",
- This will automatically launch the scan on your Windows 10 PC,
- You will then need to select printer which poses a problem,
- Then if Windows detects a problem, follow the utility steps to resolve it.
If you want to have more of information and advices concerning a printing problem on Windows 10. We suggest you read the following article: WINDOWS 10 PRINTING PROBLEM
To conclude : in theory install a WiFi printer on a Windows 10 PC is not complicated. However, it is true that the connection can problematic. So if you are in this case, do not hesitate to use the Windows troubleshooter. Then you can connect your printer via the cable to see if it is working properly. If not, you can contact support from your printer manufacturer. Finally in case your problem persists at your level computer, it is also possible to contact the Microsoft support.
How to Install a Wifi Printer on Windows 10
Source: https://winxptalk.com/en/comment-installer-une-imprimante-en-wifi-avec-windows-10/